I did not make as much progress this week on my Gygax ’75 Challenge effort. I have the basics of the dungeon laid out–but I could spend a month doing more!
What Were This Week’s Tasks?
Just as a reminder, the tasks for the first week of the Challenge were to:
- Describe the entrance to the dungeon in 7-10 words.
- Set aside at least one page in your notebook for a point-to-point map.
- For each level, include 1d6+6 rooms/areas and connect them.
- Include 1d3+1 ways up and down between levels.
- Come up with one theme per level.
- Make a list of 11 monsters and place them.
- Spread 1d6 features through the dungeon.
- For each room, note whether there is treasure.
- Name three wondrous items and lace them.
- Spend any remaining theme budget on details.
- Bonus: Mao the dungeon.
- Bonus: Create a wandering monster table.
So how did it go?
Not as well as I wanted. I was pretty busy this week–life intrudes. But I did get the dungeon laid out in a point crawl, and the rooms identified and planned. With some great advice from the always helpful and insightful Jeff Vandine, I think I have a pretty solid dungeon, with some cool features.
In addition, I came up with a point crawl for the players on the approach to the dungeon. I placed the dungeon in a mountain area, in what I envisioned as a steeply sloped mountain wall. I wanted a way to show paths that would let the party climb up to the dungeon, without having to worry about any mountain climbing rules, etc. I could also work in hints and clues about the dungeon into the point crawl itself.
That is about as far as I got. I have the three levels. I have the themes. I have the ways to connect the rooms. I have the monsters. I did not get the treasure or wondrous items finished. I have the details of the rooms in my head, but I did not get them written up as well as I would like.
I also did not get a solid physical map drawn up. I have a sketch, but it was made with about 2 more iterations of the point crawl (bubble) map made. In addition, I did not pimp the map up–I made the map using draw.io, and just left the maps electronically.
And that brings me to a conundrum. I really wanted to write everything up in the physical notebook, but I found myself at a point where it was way easier to consolidate the dungeon information in my Ulysses app on my computer. Editing and revising the text just works out more efficiently on a computer with a word processor than on paper, old school ethos not withstanding.
What I Did
So here is what I did (forgive me, there’s a lot of text):
- Dungeon Concept. The general concept of the dungeon is that of an ancient ruined temple, now inhabited by degenerate cultists who worship an evil god, the Dragon. The Temple of the Dragon is located in the mountain wall, high above the forest floor below. It has three levels, with the first level located half in and half out of the mountain rock. It was a more public area where non-initiates could see the religion. The second level below that was the main temple area, with the holy of holies for the original builders. It is now inhabited by ghouls and other creatures. The third level was carved from the living stone, and was used by the builders to perform human sacrifices to their Dragon god.
Themes:
Level 1: Ruins with secrets.
Level 2: Grandeur with hidden dangers.
Level 3: Raw evil with a gateway to the underworld.
I used the guidelines provided by Ray Otis to come up with a number of rooms, features and wondrous items. I added a number of connections between the rooms and levels, and placed the creatures at various points in them, base don the themes for each level.
The Entrance Description. "Ruined temple door, overgrown and dark, smell of corruption."
There are actually 4 ways into the Temple:
Main Entrance. The main entrance to the Temple is a flat, open area with a number of ornate columns leading to the Temple door. Many of the columns have fallen or are otherwise broken. The area has a low stone wall around it, and overlooks the mountain paths up to the Temple. The cultists who inhabit Level 1 have guards at the main entrance, with one usually watching the approach paths.
Spider Entrance. There is a tunnel entrance above the Temple, that is used by the giant spiders that make their nest in former Sacristy room (1.9). The spiders dug out an air shaft and widened it in order to get into the room. The entrance has rough gravel and stones around the hole.
Hidden Entrance. There is a hidden entrance to the Temple that is used by the evil sorcerer who makes his home on Level 3. There is a secret door that is always closed. The sorcerer uses this as a secret way to get out of the Temple unseen without passing through the other levels of the Temple.
Underworld. Inside Level 3 there is a roughly-hewn pit that drops from the Sacrifice Room (3.8) down into the deep underworld below the Temple. There is a strong sense of corruption and evil around the pit.
-
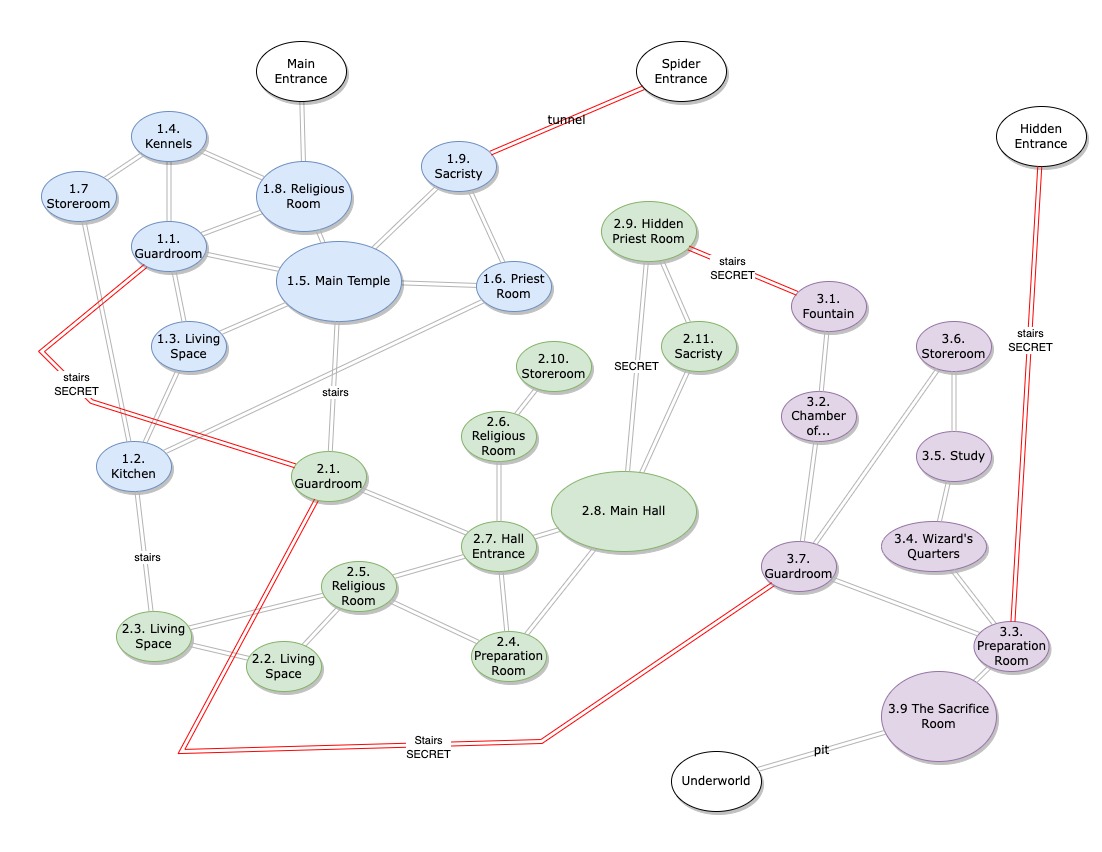
Dungeon Map. Here is the dungeon point crawl map.
-
Approach Point Crawl. This is a simple point crawl for the players to go through as they climb up the mountain arm wall to get to the Temple. The paths will be a mixture of mountain trail and roughly-hewn stairs.
- Ground Level. Beginning of a path that climbs up the mountain wall and winds its way up and over the mountain arm. The path appears to be somewhat used.
- Ground Level. Looks like a path that climbs fairly steeply up the mountain wall, and winds its way up and down over some ridges on the mountain arm. The path does not appear to be commonly used, with minor rocks falls and obstructions slowing progress.
- Rockslide. Multiple paths converge on a junction that looks to be a resting spot in the path up the mountain. A large rockfall has covered most of the space, and looks to be fairly recent. The rockfall appears unstable, and crossing it is risky. Roll 3/DX to successfully pass it. Failure takes 1d6 damage.
- Waterfall. A large waterfall covers the path and obstructs travel. Roll 3/IQ to spot a path that bypasses the waterfall. Otherwise travelers must return.
- Trap. The crossroads path area has a deadfall trap designed to slow down and identify anyone coming up the path to the guards above. Roll 3/IQ to spot the trap, and 3/DX to avoid the trap. Otherwise, take 1d6 damage.
- Resting spot. A large flat area that is for travelers to rest and recover. There is a covered area with protection from the weather, a firepit and a small stream that provides provides water.
- Guards with war dogs. Path has a small flat area. Normally the area is clear, with signs of recent travel. Roll 1d6. On a 1, encounter 2 guards with 4 war dogs. This area is under view of Temple.
- Dead spider. This flat area shows signs of a recent fight. There is the carcass of a dead giant spider. Roll 1d6. On a 1, encounter 2 guards with 4 war dogs. This area is under view of Temple.
-
Level 1. The first level of the dungeon was the public area of the Temple. Any non-acolyte visitors would be limited to this level. It is now inhabited by a group of cultists who worship the Dragon god.
- 1.1. Guardroom. This room is used by the cultist guards to protect the entrance to the Temple, and keep the other cultists from leaving. They will have 1d6 war dogs with them at any time. There is a secret stairway down to the Guardroom (2.1) on Level 2, but the cultists do not know about it.
- 1.2. Kitchen/Storeroom. This room is used by the cultists as their kitchen area. There will usually be one of the cultists here cooking or preparing food. There is a sealed door down to the Living Space (2.3) on Level 2. The room has a haunted feeling with lingering evil beyond the door.
- 1.3. Living Space. This is the main dorm area for the cultists. There are usually 1d6 cultists here in the day, and 1d6+6 at night.
- 1.4. Kennels/Library. This room was a former storeroom or library for the original builders. Now it houses the kennels for the 10 war dogs the cultists use for protection.
- 1.5. Main Temple. This is the main temple are that is used by the cultists to worship their god. This was originally the public area of the Temple, so it does not include the elaborate features of the Main Hall (2.8) on the private, Level 2. The room has a stairway down to a Guardroom (2.1) on Level 2. This room is blocked off by the cultists at the bottom of the stairs because of the evil on Level 2.
- 1.6. Priest Room. This room adjoins the Main Temple (1.5) and is used by the cultists’ high priest as his quarters and private area.
- 1.7. Storeroom. This is a former storeroom used by the builders. It is now used by the cultists to grow hallucinogenic gray lotus plants for use in their ceremonies. Anyone entering the room must roll 3/ST to avoid becoming intoxicated.
- 1.8. Religious Room. This room was a used by the builders for religious uses, but is now used by the cultists as a storeroom.
- 1.9. Sacristy. This room was used by the builders as a place to house religious artifacts. It is now used by a pack of giant spiders as their underground nest. It is connected by a tunnel up to the surface. The cultists keep the door locked and barred as protection from the spiders. When they do capture prisoners or find victims to sacrifice, they will quickly open the door and throw them into the room as a sacrifice to the spiders.
-
Level 2. The second level of the dungeon was the real temple area for the builders, where the initiated would worship the Dragon god. It is now haunted by a pack of ghouls under the control of the sorcerer on Level 3. It is more ornate and lavish than Level 1, and has not suffered quite the toll of time as Level 1.
- 2.1. Guardroom. This room was used by the builders as a final guardroom to protect the Main Hall (2.8). It is now overrun with green slimes, who will attack any living thing that enters the room. There is a secret stairway up to the Guardroom (1.1), but the cultists do not know about it. It also has a secret stairway down to the Guardroom (3.7) located on Level 3.
- 2.2. Living Space. This room was used by builders as living space. It now only contains rubble.
- 2.3. Living Space.This room was used by builders as living space. It now only contains rubble. It is connected to Level 1 by a stairway to the Kitchen (1.2), but is sealed off.
- 2.4. Preparation Room. This room was used by the builders as a place to prepare for their dark rites in the Main Hall (2.8). It is now inhabited by a nest of grave moths that will attack any intruders.
- 2.5. Religious Room. This room was used by the builders for various religious purposes. It now only contains rubble.
- 2.6. Religious Room. This room was used by the builders for various religious purposes. It now only contains rubble.
- 2.7. Hall Entrance. This is a room adjoining the Main Hall (2.8). It was used as a final preparation and entrance room before entry to the Main Hall. 2d6 ghouls will haunt this room and the Main Hall (2.8) while the others roam the other rooms and stalk any intruders.
- 2.8. Main Hall. This large room is the main room where the builders housed the idol of their Dragon god and worshipped it. The room is a large rectangle, with ornate columns along the side, forming long hallways on the side of the room. The idol altar are on the end opposite the Hall Entrance (2.7). The idol is a 20′ high statue of a coiled Dragon, with its front 2 legs stretched out to the sides. The dragon resembles a very large snake, with smooth skin, 6 legs and a large head that resembles a cross between a toad and a catfish. The idol is carved from a black rock. 2d6 ghouls will haunt this room and the Hall Entrance (2.7) while the remaining ghouls stalk any intruders in the other rooms.
- 2.9. Hidden Priest Room. Behind the idol in the Main Hall (2.8) is a hidden room used by the Temple priests for their dark rites. It will be inhabited by 1d3 ghouls, who will hide and attack from ambush. The room has a stairway down to the Fountain Room (3.1) on Level 3. The ghouls will not go down these stairs.
- 2.10. Storeroom. This room was originally used by the builders as a storeroom. It contained only rubble now.
- 2.11. Sacristy. This room was used by the builders as a sacristy to house their holy objects. The room is haunted by more slimes, that will attack anyone who enters.
It still contains an artifact of the builders, found in a gilded container inset in the wall. The container is locked–and trapped. The trap is a poisonous catch, that will deal 2d6 poison damage to anyone who tries to open the container. The catch requires a 4/IQ to spot, and 3/DX to disarm or bypass. The artifact is the Jewel of Blissful Night (see below).
-
Level 3. Level 3 of the dungeon was a secret place, built into a natural opening in the living rock. It was originally used by the builders as a place for human sacrifice in a room with a pit that drops far down into the Underworld. It is now used by the sorcerer as a base as he studies necromancy and the secrets of the Dragon.
- 3.1. The Fountain Room. The Fountain Room is a large room with a large fountain in the center. The fountain seems out of place–it is elaborately carved in the rough stone room. It also is the home for a giant snake. The snake will not immediately attack any intruder, but will attack anyone who tries to move past it to the room beyond. It is connected to the Priest’s Room (2.9) by some secret stairs.
- 3.2. Chamber of Perpetual Darkness. The Chamber is smaller than the Fountain Room (3.1), but is in an unnatural, absolute darkness. The only light available is from a small area that glows green along the north wall. This wall has a roughly carved sculpture of the Dragon, and appears to be incredibly old. The sculpture itself glows a sickly green color, and appears to be made of a rough black stone. The head of the Dragon appears to be smooth. The sculpture controls access to the door into next Preparation Room. It can only be opened by placing you hands on the head of the Dragon figure and thumbs on its eyes. When this is done, the door to the Preparation Room opens and light from there can show the way on to it. It takes a 3/IQ to notice the smoothness of the sculpture.
- 3.3. Preparation Room. This room was used by the builders as a preparation room before entering the Sacrifice Room (3.8).
- 3.4. Sorcerer’s Quarters. This former priest’s room is now used as the quarters of the sorcerer who lives on Level 3. The sorcerer will either be found here or in his study. He always carries the Wand of Death and the Staff of the Dragon’s Eye (see below).
- 3.5. Study. This former storeroom is now the study and work area for the sorcerer who lives on Level 3. The room contains a number of books and sorcerous books. It contains a secret bypass tunnel up to the surface.
- 3.6. Storeroom. This room is used as a storeroom by the sorcerer.
- 3.7. Guardroom. This room was used by the builders as a guardroom before entering the Sacrifice Room (3.8). It was also to stop any victims from escaping their intended sacrifice. It is still used for that purpose by the sorcerer. The room contains 4 dragon men, who are in a state of stasis. If anyone besides the sorcerer enters the room, they will come alive and attack. The sorcerer can also activate them as needed. The room is connected by a secret stairway up to the Guardroom (2.1) on Level 2.
- 3.8. The Sacrifice Room. This is a relatively small, circular room, with a large opening in the center. This pit was used for sacrifices by the builders. The sorcerer uses it for the same purpose. The room has a distinct aura of evil and darkness. The Sacrifice Room has an additional 6 dragon men who will attack any intruders as well. The pit connects to the Underworld below (possible connection for future adventures). It also has a secret stairway up the surface.
-
The 11 Monsters.
-
- Cultists. There are 25 cultists inhabiting the upper level of the Temple. These include a high priest and his acolytes, 4 guards and 17 rank and file cultists. The guards wear cloth armor, with the others unarmored.
The cultists live in the side rooms, and worship in the Main Temple area. They are praying to their god the Dragon, and hoping for his return. They know there is a larger temple area below them, but know that there is some evil horror in the depths that they cannot defeat. They keep the doors to the second level tightly bound to prevent that evil from coming up, and shy away from those areas. They do not know that the evil is a pack of ghouls, nor do they know of the sorcerer below the ghouls.
They do know of the giant spiders in the back room that connects to the main stairway down to the Main Hall on Level 2. They keep that door closely guarded and strongly bolted. If they manage to capture any victims, they will sacrifice them to the spiders by performing rites, and then quickly throwing them through the door to the back room.
-
- War dogs. There are 10 war dogs used by the cultists as additional protection and for intimidation of the rank and file. The guards house them in the Kennels room, and keep them on hand at the main entrance. At any time, there will be 4 war dogs at the main entrance with the guards. The rest will be in the kennels in cages. The cultists do not let the dogs roam freely due to the danger resented by the giant spiders.
-
- Magical plant. The gray lotus is a plant used by cultists to create intoxicating drugs for use in their rituals. Smelling these magical plants can cause the victim to become dizzy and sleepy.
-
- Grave Moths. There are 1d6+6 grave moths in the Preparation Room (2.4) on Level 2. These creatures will attack any intruders, feasting on their blood. They are also used as an alarm of sorts by the ghouls, who will drive them off and eat any victims from the moths.
-
- Giant Spiders. A nest of giant spiders infests the Sacristy (1.9) on Level 1. These spiders live there, and venture out to hunt on the surface outside. The spiders know that they will be fed when they hear the door being opened by the cultists, and will gather to feed on the sacrifice. If the door is left open, the spiders will go through and attack anything they find.
-
- Slimes. A colony of slimes inhabit two rooms on Level 2. They will attack any living thing that ventures close to them. These creatures are also used by the ghouls as an alarm system to warn them of approaching intruders.
-
- Ghouls. There is a nest of 2d6+6 ghouls that inhabit Level 2 under the control of the sorcerer on Level 3. These ghouls are in various stages of recovery from summoning, from raw skeletons to partially fleshed to full-on human-like. They are always hungry–and angry. If they attack any intruder, the sorcerer must make a 2/IQ test. If he fails, the ghouls slip his control and will attack him as well.
-
- Sorcerer. The sorcerer Tortgyth inhabits Level 3, and is studying necromancy and the magics of the Dragon. He was expelled from the Vales by the other wizards, who found the direction of his studies too extreme even for them. When threatened, he will release the dragon men upon any intruders and attempt to flee by his escape tunnel. He will fight only if cornered. If cornered, he will attempt to summon a dragon. He will be successful on a test of 4/IQ. See below for the disastrous effects.
-
- Giant Snake. The giant snake lives in the fountain. The sorcerer feeds it occasionally with captured creatures and people. He uses the snake as an alarm for anyone coming into the level, and to slow them enough for him to get in place to attack them or make his escape.
-
- Dragon Men. There are 10 dragon men found on Level 3. Dragon men are an unnatural hybrid of humans and the Dragon god. They appear as strongly muscled humans, with black skin and the head of the Dragon–a cross between a toad and a catfish. They are armed with large swords and have leather armor. They speak their own language, and do not understand any human tongues.
-
- Dragon. Dragons are legendary creatures that were the dark embodiment of their god the Dragon. They are 20-50′ long snake-like creatures, with greenish black smooth skin, a sickly yellow-green underbelly and 6 legs. They have a head that resembles a cross between a toad and a catfish, with large fangs. They have no wings or breath weapon, but are poisonous and can control minds.
Dragons live far below in the underworld. They are attracted by loud sounds coming from the pit. They are used to sacrifices being thrown to them. They are extremely dangerous, and will kill anything they encounter. if the sorcerer is successful in summoning one, it will appear in 2-3 turns, come up through the pit and attack everything. The only hope characters have is to flee these giant monstrosities, or be smashed to a pulp.
-
-
The Features.
-
- Trap. The trap is found in the Sacristy (2.11). The trap protects the Jewel of Blissful Night.
-
- Chamber of Perpetual Darkness. (3.2) The Chamber is a magically dark room that limits who can pass on to the remaining rooms.
-
- The Main Hall. (2.8) This is the major temple area that the builders used to worship their Dragon god.
-
- The Pit. (3.8) The Pit is the place the builders sacrificed their victims to the Dragon.
-
-
The Wondrous Items.
-
- Jewel of Blissful Night. This is a large red jewel that allows the holder to control the minds of up to 3d6 people. They get a test of 3/IQ to resist the control of the jewel. This is found in the container in the Sacristy (2.11) on Level 2.
-
- The Wand of Death. This is a small bone wand that the sorcerer uses to help him control the ghouls on Level 2. It allows him to use one less die when rolling to control the ghouls (he uses 2/IQ, not 3/IQ).
-
- The Staff of the Dragon’s Eye. This a long black staff, with images of dragons carved along its length. The Staff allows its bearer to summon a dragon on a test of 4/IQ. A further roll of 4/IQ is required to control the dragon once it appears.
-
-
The Treasure. I have not really worked through the treasure for the dungeon yet. More to come.
-
Wandering Monsters. The wandering monsters will be based on location–outside, Level 1, Level 2 or Level 3. I have not completed this part yet, either, and will try to update this next week.
And that is as far as I have gotten. As I was writing that up, it seemed like a lot, but I know there is a lot of work I could do to polish it up and add more details. As I got into the mindset of the dungeon, I found more and more stories that could be written up about it, and I had to resist the urge to go down that rabbit hole!
What Next?
The goal for next week is the town!
I definitely need to go back and clean up the technical debt from this week after I finish the tasks for the town in Week 4. That will be a big challenge, but I will also not be as busy next week as I was this one. That will give me a bit more time to work on the Challenge!
The town of Tirbreth will be fun–a smaller town, set on the main river through the Vales. I need to set up the main story for the town, but also add the hook for any party to discover the Temple of the Dragon!
The thing I have to keep remembering is the goal with the Gygax ’75 Challenge is to not get mired down in the details of any one part of the process, but to get the bones laid out and move on. A Referee will always have time to finish more detail after play starts, and can do a lot more simply at the table.
But what do you think of my progress so far? Is the dungeon fun or a dud? Let me know in the comments below!
Marko ∞
